Best LED Lighting Kits for Pinball Machines
Last updated January 26, 2026 · By Zach Lane ·How we choose products · Affiliate disclosure

A tiny switch can change everything. I still get a little buzz thinking about the first time I yanked an old incandescent from my machine and dropped in a crisp LED. The playfield woke up: colors sharpened, corners revealed details I hadn't noticed in years. That tiny win is exactly why I wrote this. I want to celebrate those moments and give you practical, hands-on advice to make your pinball sing, from how the light sits on the playfield to how the parts hold up over time.
Bring curiosity. I walk you through squeezing lights into tight, varnished rails, testing brightness and color balance so ramps and plastics glow with purpose, and matching control gear so your effects behave without flicker or fuss. I’ll also give real-world notes on wiring, power choices, and the point where a soldering iron actually pays for itself. Expect straightforward observations on durability and finish, and how each choice changes the quiet zone’s vibe.
Read on for sensory-driven reviews and installation tips that respect both craftsmanship and atmosphere. I’ll point out easy weekend upgrades and cleaner, more refined options if you want your machine to read like curated furniture. By the end you’ll know what to buy, how to install it, and how to tune the glow so your quiet zone feels intentional, immersive, and unmistakably yours.

RetroArcade.us 10 Pack Pinball Replacement Bulb LED 6.3 Volt AC, 555 Clear Wedge Base T10 Cool White
Pinball Neon Sign USB Powered Pinball Neon Light for Wall Decor Dimmable LED Pinball Light Up Sign for Game Room Club Man Cave Neon Signs Decor Birthday Party Gift(16.7 * 9In)
Kasa Smart LED Light Strip, RGB, 32.8ft(2 Rolls of 16.4ft.) Wi-Fi LED Strip Works w/ Alexa & Google Assistant,High Brightness, Trimmable, Up to 25,000 Hours,2Yr Warranty (KL400L10),Multicolor

Philips Hue Indoor 6-Foot Smart LED Light Strip Base Kit with Plug - Flowing Multicolor Effect - 1 Pack - Control with Hue App - Works with Alexa, Google Assistant and Apple HomeKit

Govee 100ft RGBIC LED Strip Lights, Smart LED Lights Work with Alexa and Google Assistant, LED Lights for Bedroom WiFi App Control Segmented DIY Multiple Colors, Color Changing Light, (2 x 50ft)
Govee TV Backlight 3 Lite with Fish-Eye Correction Function Sync to 55-65 Inch TVs, 11.8ft RGBICW Wi-Fi LED Strip Lights with Camera, 4 Colors in 1 Lamp Bead, Voice and APP Control, Adapter

PHILIPS Hue Indoor 10 Ft Smart RGBWW LED Solo Lightstrip Base Kit, 1 Pack, Control with Hue App, LED Strip Lights Compatible with Alexa, Google Assistant and Apple HomeKit

Govee Gaming Light Bars Pro, Upgraded 16-Inch Smart Triple-Sided RGBIC Illumination Wi-Fi LED Gaming Lights, Music Sync & 60+ Scene Modes, Works with Alexa & Google Home, Game Room Decor
Philips Hue White & Color Ambiance Play Light Bar 2 Pack, Smart LED Light, Compatible with Alexa Google Assistant, 16 Million Colors, Hue Bridge Required, Sync TV Movies Music Games, 2 Pack, W/Cloth

StarTech.com 160W Universal DC Power Adapter (24V/6.6A), 4ft(1.2m) 2-Wire Cord, 2/3-Pin Terminal Blocks, 100-240V AC/DC External Power Supply for Industrial USB Hubs, NA/UK/EU/ANZ (160W-POWER-ADAPTER)

M12 REDLINK Soldering Iron Kit W/LED Light

Weller 70 Watt Digital Soldering Station | WE1010NA

Apple 20W USB-C Compact Power Adapter: Fast and Convenient Charging, Type C Wall Charger
Our Top Pick
Apple 20W USB-C Charger steps in as a small but vital tool for any pinball lighting upgrade. Full playfield LED strips need dedicated 5V or 12V supplies, but this compact charger keeps your phone, tablet, and USB-C test gear powered while you work. It speeds up device charging, powers USB-C controllers and test rigs for quick brightness and color checks, and sits quietly behind a cabinet without drawing attention in the quiet zone.
This charger is my top pick because when you’re halfway through an install, reliability matters. It delivers consistent USB Power Delivery, runs cool, and cuts downtime by topping up devices fast. Limits? It won’t drive big LED arrays and there’s only one USB-C port, so pair it with proper power bricks and the right cables when you go full-strip. Short version: worth it for any builder who wants dependable, low-clutter power while they work.
Key benefits and standout features:
- Fast USB Power Delivery, so phones and USB-C devices charge quickly and tools stay online.
- Compact, low-profile design fits behind cabinets and on wall outlets without looking bulky.
- Broad compatibility with phones, tablets, USB-C LED controllers, and many USB-C test rigs.
- Reliable thermal performance, runs cool during normal testing and charging.
- Keeps your bench tidy and minimizes charging clutter in a well-curated quiet zone.
- Honest limitations: not a replacement for dedicated high-current LED power supplies, single port only, cable not included.
Keep your devices powered and your install moving. Little conveniences like a reliable USB-C charger separate a smooth upgrade night from a stop-and-start headache.
Glow Where It Matters: Pinball-Specific LED Kits That Transform Play
Pinball-specific LED kits are the quickest way to give an older machine new personality. These kits are designed around the playfield, so they think about bulb fitment, how light diffuses through plastics, and the contrast you want between bumpers and ramps. When choosing one look for accurate color temperature and even beam spread so decals pop without harsh hotspots. Material quality matters too - solid connectors and neat wire routing age better than flimsy tape and brittle leads. Some kits give brilliant color but demand more cutting and wiring; others are plug-and-play but skip nuance. I’ll help you choose the right balance of ease, finish, and longevity.
RetroArcade.us 555 T10 LEDs
If you want a quick, no-fuss way to sharpen a vintage playfield, these RetroArcade.us 555 T10 LEDs are exactly the kind of plug-and-play swap that makes a weekend feel productive. They’re made for 6.3V AC sockets, so they drop into the same wedge bases your old incandescents used without adapters or rewiring. The cool-white output cleans up muddled tones and teases out engraved details under plastics and ramps. They run cooler too, so you worry less about melted lenses during marathon sessions in the quiet zone. Toss a handful into key lanes and the improvement is immediate: targets pop, artwork reads better, and that decade-old amber melt simply disappears.
These are for hobbyists who want reliable, affordable swaps rather than RGB theatrics. Pros: true drop-in compatibility with 555/T10 wedge sockets, low heat and long life, easy install for beginners (no soldering), and a consistent cool-white that modernizes older tables. Cons: single-color cool white only, not addressable for dynamic effects, and the clinical brightness can wash certain plastics-test a few before you run the whole field. Quick tip: replace bulbs in matched groups (backbox, inserts, ramps) to keep color balance even. If you want a straightforward refresh that looks sharper without a rewiring headache, these are a smart start.
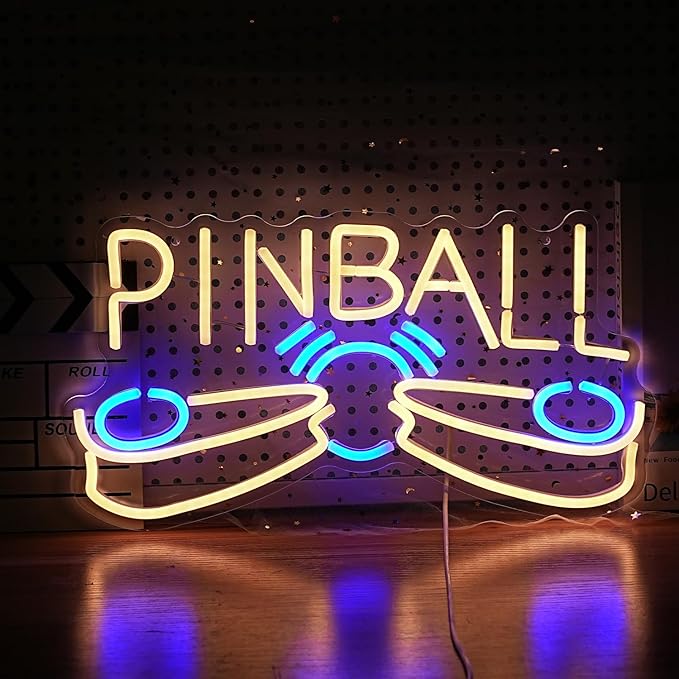
LIUOZHTEA Pinball Neon Sign
This USB-powered pinball neon sign is the kind of accent that turns a corner of your quiet zone into a destination. Laser-cut acrylic and a soft LED neon strip give an even, low-voltage glow with three-button dimming so you can go from subtle backlight to bold arcade pop. The 78-inch USB cord and included hooks, chain, and nails make it a one-coffee-job to hang. I put mine above the bar and it instantly pulled the area together, nostalgic but not toy-like. It comes in a few color combos and includes a protective film you should peel off before showing it off.
Where this sign really helps in a pinball-focused quiet zone is atmosphere, not playfield lighting. It complements playfield LEDs by creating a wall focal point or background behind a cabinet, lifting the vibe when the machine idles between games. Practical notes: use a discreet USB adapter or a powered USB hub tucked behind the cabinet to hide the cable, and try command strips if the chain feels fiddly. Pros: easy install, dimmable, great mood lighting, solid finish for the price. Cons: acrylic (not glass neon), fixed color choices, and it won’t replace purpose-built playfield LEDs. If you want a low-effort piece that makes your quiet zone feel curated, this is an excellent add-on.
Seamless Accent: LED Strips That Contour Your Machine and Room
LED strips are the chameleons of lighting, hugging curves and filling cavities with consistent color. In the quiet zone they set atmosphere: warm white feels cozy, saturated RGB makes every multiball cinematic. When shopping, check adhesive strength, IP rating for longevity near glass or moisture, and the strip’s color rendering so printed artwork looks natural. Cut points and connector quality matter too. A tidy solder or a solid quick connector keeps an install clean. I’ll show how different strips behave under gloss plastics and how diffusers or cloth covers soften hotspots, so you can pick strips that deliver both wow factor and refined material quality.
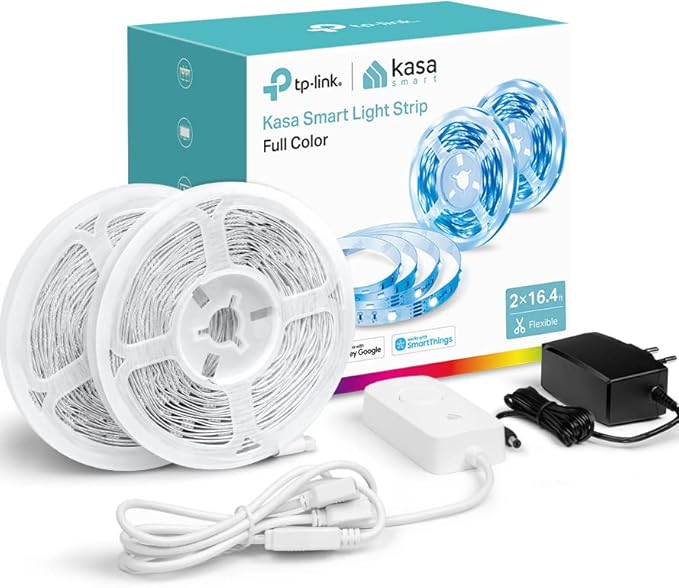
Kasa Smart LED Light Strip
This 32.8 ft Kasa Smart LED strip is a solid way to add rich, controllable ambient light to your quiet zone and pinball setup. Two 16.4 ft rolls, 16 million RGB colors, animated effects, and app or voice control make scene-setting simple. I liked firing up a few presets or having the lights follow a schedule during late-night sessions.
What stands out is the length and the smarter ecosystem. Two rolls let you run one strip behind the backbox and another under the cabinet without buying extra kits. The app presets and voice integration make it easy to match wall color, TV bias lighting, or a game-night vibe. This model is single-zone (non-addressable), so you won’t get per-segment chases. If you want tiny, pinball-style pixel effects, look at addressable options.
Installation is easy but worth doing carefully. Clean the mounting surface with alcohol, unroll and test before you stick, and cut only at marked intervals. The adhesive is fine on painted surfaces, but on varnished wood I add clear mounting clips or clamps for insurance. Long runs may show slight dimming; plan power injection or support clips where needed.
Bottom line: a budget-friendly, smart accent light that transforms a room and complements a cabinet without complex wiring. Pros: lots of length, solid app/voice integration, easy install. Cons: single-zone, mixed reports of Wi-Fi reliability, adhesive can be hit or miss, moderate brightness (great for accent, not primary lighting).
Pixel-Perfect Drama: Addressable Strips for Dynamic Effects
Addressable strips let each LED behave independently, producing flowing chases, per-segment colors, and precise highlights that make a playfield feel alive. They’re the obvious choice if you want scenes that follow ball motion or sync to sound, but they come with more wiring and planning. Look for strips with dense, well-balanced diodes for smooth gradients and minimal banding, and match voltage and data protocol to your controller. Power injection and heat management matter - long runs can dim toward the end if you skimp on supply. I’ll walk you through the visual payoff versus the extra wiring so you can decide if the choreography is worth it.
Philips Hue Lightstrip 6ft
This Hue gradient lightstrip brings cinema-grade color and a soft, even glow that makes a pinball playfield sing. The silicone milky sleeve smooths individual LEDs so plastics, ramps, and toys glow without hot spots. Gradient blending lets you paint a ramp with flowing hues instead of one flat color. Pair it with the Hue app, voice assistants, and a Hue Bridge and you get dynamic scenes, timed automations, and sync-with-audio or game effects - great if you want the backbox and apron to react to music or match a table theme. The strip is flexible, extendable, and bright enough to be seen across a dim quiet zone without blinding you while you play.
Practical note: this is premium and user-friendly, not a hacker’s dream. Finish, color fidelity, and app control are excellent, but adhesive and reliability can be picky. If you plan to route it into tight cabinet corners or cut and rewire segments, bring extra mounting clips, 3M tape, and test the strip on arrival. Best for enthusiasts who value color quality, seamless gradients, and smart-home integration. If you want full per-segment scripting right out of the box, a dedicated addressable controller will be more flexible. For most builds though, this Hue strip upgrades vibe and polish in one tidy package.
Govee RGBIC LED Strips
If you want a playfield with personality, this Govee RGBIC kit is a fast, high-impact move. The addressable RGBIC chips let you paint segmented colors along a single strip so ramps, plastics, and backglass can each wear their own hue. The app and voice control make quick scene changes painless. Music-sync and the built-in mic add a party layer for gatherings, and the two long rolls mean you can run strips around the cabinet perimeter, under rails, and along the backbox without scavenging parts.
Practical stuff: the adhesive sticks well on clean, smooth surfaces but bring 3M for textured wood or varnished rails. These strips aren’t waterproof, and the power/controller layout matters - plan where the controller sits and where you’ll inject 24V power. Cutting points and solder pads are usable if you want tidy joins or to tuck strips into recesses. Color fidelity is impressive for mood lighting, though whites skew warm and occasional units can be flaky; treat this as a high-value upgrade, not industrial gear.
Who should buy it? Weekend tinkerers who love customization and quiet zone builders aiming for immersive ambiance. Pros: dramatic multi-zone effects, app/voice control, long length for full coverage. Cons: adhesive variability, not waterproof, occasional reliability outliers, whites not studio-true. If you want your pinball to look staged for highlight reels, this is a playful, solid choice.
Controllers That Turn Light Into Atmosphere
A controller is the brain of your lighting, deciding whether lights breathe, chase, or explode on command. Responsiveness, channel/zone count, and addressable pixel support are the big callouts. Build quality and mounting options matter too - a sturdy enclosure and clear labeling save a lot of headaches later. I’ll be blunt about features that matter versus gimmicks so you pick a controller that fits your skill level and design goals.
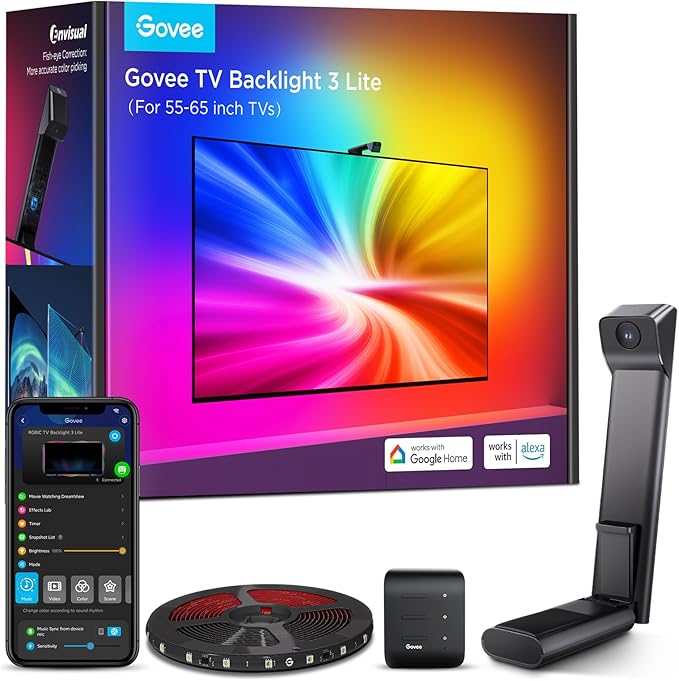
Govee TV Backlight 3 Lite
This kit is more than TV bias lighting. The upgraded Envisual chip and fish-eye correction camera give tighter edge color matching, and the RGBICW lamp beads add a separate warm white channel so colors feel richer and whites look natural. In a quiet zone the obvious win is atmosphere. Mount it behind a TV, under a shelf, or around a pinball backbox and the area feels cinematic. DreamView syncing lets you add other Govee pieces for full 360-degree ambience, and app or voice control makes switching scenes painless.
Installation is straightforward if you plan ahead. The gravity-mounted camera wants a clear, centered view, so for non-TV uses that can be quirky. Bring extra clips or 3M if you’re mounting to varnished wood or curved metal. Calibration takes patience; do it in a dark room, lower saturation if whites skew green, and have a phone hotspot handy if Wi-Fi is slow. Performance is strong: smooth transitions, solid color density, and useful blank-screen/black-bar options. Downsides: the camera sync only works when positioned correctly, some users report adhesive or longevity issues, and video mode needs 2.4 GHz Wi-Fi.
Bottom line: a practical pick for easy, room-level upgrades that bring a TV area or pinball corner to life without rewiring the machine. Want per-coil or per-target pixel control inside the cabinet? Look to hobby controllers instead.
Philips Hue Lightstrip Solo
If you want a playfield to pop without wrestling with custom controllers, this Philips Hue Solo 10 ft strip is very practical. It gives true RGBWW plus a dedicated white channel, so you get rich hues for mood and a clean warm white for visibility. At 1700 lumens the strip is bright enough to wash cabinet interiors or underside of ramps and plastics, revealing detail cheap RGB strips often wash out. The soft silicone sleeve smooths the glow for photos and for showing off decals.
What sets this apart is the Hue ecosystem. Use Bluetooth for quick tests or add a Hue Bridge for automations, remote control, and sync options. It is not addressable per LED, so you won’t get chasing pixel effects unless you mix it with other Hue gear or external controllers. That makes it ideal for consistent ambient washes and color scenes rather than complex light-chase showpieces.
Practical tips: measure twice before you cut, because trimmed pieces can’t be reconnected. Reinforce the adhesive with 3M or mounting clips for vertical runs inside a cabinet. Power lead length can be limiting in tight builds, so route carefully and hide the transformer behind the apron. If you want effects tied directly to gameplay, expect to add a Hue Bridge or third-party interface.
Bottom line. Pros: brilliant true whites, smooth diffusion, great app ecosystem and reliability. Cons: not extendable, pieces are single-use once cut, adhesive can fail, not pixel-addressable. Perfect for quiet zone owners who want a premium, low-fuss ambient upgrade that lifts a cabinet from good to gallery-ready.
Light Bars That Add Punch and Clean Lines
Light bars give architectural impact: focused, even illumination for backboxes, cabinets, and shelving with a slim, finished look. Look for diffusers that eliminate hot spots, robust mounting brackets that sit flush, and finishes that resist fingerprints and dust. Dimming range and beam angle matter - too narrow and you get streaks, too wide and contrast disappears. I’ll describe how different bars sit under glossy plastics so you choose units that feel integrated and elevate the material story of your machine.
Govee Light Bars Pro
If you want an easy, high-impact way to make a pinball cabinet feel like curated furniture, these Govee Light Bars Pro are worth a look. The triple-sided RGBIC design gives a layered, 3D glow that makes plastics, ramps, and backglass art pop without blinding glare. The weighted bases work great for shelf or cabinet-top placement and the diffusion softens LED dots so you get smooth washes. App control, music sync, and voice control are handy during late-night sessions when you don’t want to fumble with switches.
Practical setup notes: they’re plug-and-play for ambient cabinet lighting, but DreamView screen-sync needs a Windows PC and the same 2.4 GHz LAN. For in-cabinet installs you can mount them behind plastics or inside the headbox; route the power cable through an existing grommet and secure the base with double-sided foam tape for vibration resistance. Expect great color accuracy and presets. Downsides: some users report clunky pairing and occasional resets after power loss, and they are not per-LED individually addressable like some premium strips.
Who should buy these: pick them if you want a fast, stylish upgrade that elevates cabinet presentation and room mood with minimal wiring and solid build quality. Pros: immersive triple-sided light, lots of scenes, easy voice and music sync. Cons: desktop color-matching limited to Windows and occasional app quirks. If you want theatrical, low-effort glow that makes your machine read like a centerpiece, these deliver.
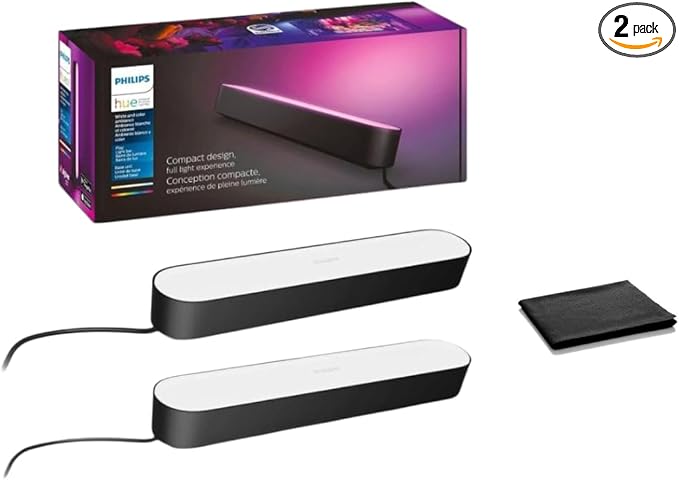
Philips Hue Play Light Bar
If you want your pinball to be the room’s centerpiece, Philips Hue Play bars are a quietly powerful option. They bring 16 million colors, flexible mounts, and smart voice control to whatever you bolt them to. Behind a backglass they create a halo that makes art pop. Behind a TV or on a shelf they layer ambient color that reacts to music and movies. The ecosystem is the standout: vivid color, smooth transitions, and media sync for immersive moments. Full feature use requires a Hue Bridge and the Hue Sync setup if you want game-synced effects. For pure in-cabinet matrix tricks you may miss direct machine integration, but for room ambience and quick scene-setting these are hard to beat.
Who should buy this for their quiet zone? People who care about mood, want easy control, and like tinkering with lighting scenes more than rewiring the whole cabinet. Pros: stellar color range, multiple mounting options, and seamless smart-home control. Cons: not a drop-in lamp-matrix replacement, and advanced syncing relies on the Hue Bridge. Installation tips: use the supplied stands or mounts, test color temps on your playfield plastics before final placement, and run power outside the cabinet when possible to keep wiring tidy. These add a polished, controllable glow that makes game nights feel cinematic.
Power That Keeps the Glow Stable: Choosing the Right Adapter
A dependable power supply is the quiet hero of any lighting upgrade. Voltage stability, headroom for peak draws, and clean output with low ripple keep colors true and controllers from resetting mid-game. Match voltage to your LEDs, ensure amperage overhead for long strips or addressable runs, and look for protection features like short-circuit and thermal shutdown. Connector types and cable length matter for clean routing through a cramped cabinet. I’ll be candid about safety tradeoffs between cheap wall-warts and heavier-duty bricks, and show how smart power choices save headaches and protect your finish.
Apple 20W USB-C Adapter
Small, sturdy, and predictable. This compact Apple 20W USB-C adapter is a clean USB-C source that works well for quick phone top-ups and for powering USB-C LED controllers while you tweak a playfield. It negotiates power delivery so compatible devices charge faster, and the build quality means you can leave it plugged into a strip behind your machine without worrying about heat or flaky connections. The single-port layout keeps things simple. I use one on the bench to feed small LED driver boards, charge a tablet that runs sound or lighting apps, or power a MagSafe puck for quick checks.
Practicality is where it shines for modders. Use it with a USB-C to 5V cable to feed small driver boards and microcontrollers while you tweak colors, test segments, or program effects. It is not a substitute for a dedicated 12V/5A LED brick when you run long strips, so pair it with the right converter if you need higher voltages. Pros: compact footprint, reliable power negotiation, Apple-level build. Cons: no cable, single port, and occasional quirks with nonstandard USB-C devices. If you want a reliable, low-fuss USB source in your quiet zone for testing and quick charging, this is solid.
StarTech.com 160W Power Adapter
This is a no-nonsense, high-capacity DC brick built to keep serious lighting and control rigs happy. It delivers 24V at 6.6A (158.4W) with auto-switching 100-240V input and ships with regional AC cords plus a 4 ft DC cord. Unlike hobby bricks that skimp on connectors, this unit includes 2- and 3-conductor terminal blocks and bare-wire leads so you can land wires cleanly on LED controllers, distribution boards, or USB hubs without hunting for adapters. That stability matters. When you push multiple zones or a combined controller and hub, this supply keeps voltage steady so animations don’t flicker.
What sets this apart for a quiet zone build is the practicality. Terminal-block wiring removes an entire step, the wide input range means it survives moves or repurposing, and it feels IT-grade rather than cheap. Minor notes: secure the brick to solid mounting, add an inline fuse sized to your load, and use heat shrink or ferrules on terminal connections to prevent stray strands. Allow ventilation, as these run warm under heavy loads.
Who should buy it. If you’re wiring a multi-zone playfield, running a couple of RGB controllers, or want a single reliable brick to feed lighting and auxiliary USB hubs, this is a smart choice. Pros: high wattage headroom, tidy terminal-block wiring, international support, and a two-year backing. Cons: heavier and larger than pocket supplies, the 4 ft DC lead may be short in some layouts, and it’s overkill for a single low-power strip. I once used a similar brick to power two controllers behind a crowded backbox and the result was clean, flicker-free lighting that let the plastics finally sing.
Tools of the Trade: Soldering Kits That Deliver a Professional Finish
Good soldering gear turns a DIY attempt into a lasting, polished mod. A stable iron with temperature control, an ergonomic handle, and quality tips makes delicate joints quick and neat. Accessories like helping hands, solder, and cleaning tools speed the process and reduce frustration. When picking a kit consider tip variety, temperature range, and the presence of a reliable stand and fume mitigation. I’ll point out which kits are forgiving for beginners and which are built for repeat, precise work. Spend a bit more on a decent iron and you’ll see the payoff in tidy joints and long-lasting installs.
Milwaukee M12 Soldering Iron
This cordless M12 soldering iron is a practical workhorse for retrofitting LED kits and controllers into a pinball cabinet. It reaches operating temperature in about 18 seconds and holds heat with a 45 watt output, which makes lamp leads, JST plugs, and small Molex joints straightforward. The built-in LED and heat-ready indicator remove guesswork when you’re working inside a dark cabinet, and tool-free tip changes let you swap between delicate board work and thicker wire splices without hunting for extra tools.
What I like most is the pivoting head and cordless freedom. The pivot helps you angle the tip into cramped areas under the playfield or around varnished rails. Battery operation means no extension cords draped across your machine. Real talk: it’s tuned for electronics and small wiring jobs, not heavy heat-sink work, battery runtime varies, and some users report tip longevity issues. I keep a spare M12 pack and spare tip. Solder in short bursts and you’ll get the best results.
If you’re a weekend tinkerer installing strips, swapping lamps, or wiring a small controller, this is a great bench companion. Pros: fast heat-up, pivoting head, cordless access, easy tip swaps, built-in LED. Cons: not for heavy-duty solder, battery life can be short with continuous use, occasional tip problems. Tip: buy an extra battery and spare tip.
Weller WE1010NA
If you spend weekends swapping incandescents for crisp LEDs, this Weller station is the tool that keeps work tidy and repeatable. The 70W iron heats fast and recovers quickly, the digital readout holds temperature within a few degrees, and toolless tip changes make swapping from a fine point to a chisel painless. The heavy rest and silicone cable feel built to survive a busy bench in the quiet zone.
Compared with bargain irons, the WE1010NA saves time and frustration. You’ll get fewer cold joints when seating LED strips, cleaner solder on controller headers, and less babysitting of a hot tip. Standby/auto-setback and ESD-safe circuitry protect delicate driver boards and extend tip life. It’s the sweet spot for hobbyists and restorers who want professional-feeling results without industrial scale.
Pros: stable temperature control, quick heat and recovery, easy tip swaps, durable rest, and safety features. Cons: mixed reports on long-term durability, some folks replace the wand over years, and be sure you buy the correct voltage variant for your region. If you want your gear to look as crisp as it sounds, this is a solid bench investment. Keep a spare tip and a roll of quality solder (63/37 or your recommended lead-free) and you’ll be cranking out neat LED installs in no time.
Your Next Steps
You’ve got a clear map. Small swaps like the RetroArcade.us 555 T10 LEDs give instant, clean white light that sharpens artwork and brings out texture. Accent pieces such as the LIUOZHTEA neon sign or a Kasa Smart LED strip can pull a corner together and set mood. For cinematic, soft gradients and fuss-free app control, the Philips Hue Lightstrip and Hue Play bars give polished diffusion and true whites. The Govee family (RGBIC strips, Light Bars Pro, TV Backlight 3 Lite) pushes playful, segmented effects and music sync.
Practical threads run through every review: strong adhesive or mounting clips matter on varnished rails, silicone sleeves and diffusers prevent hotspots, and honest power planning keeps colors stable and prevents flicker. Recommendations are simple when you match ambition to tools.
Weekend refresh plan: start with drop-in bulbs (RetroArcade T10s), add a Kasa strip for cabinet wash, and keep an Apple 20W USB-C adapter on the bench for quick controller tests. Next-level, theater-grade build: commit to addressable strips (Govee RGBIC or Philips Hue gradient), pair them with a hefty StarTech.com 160W adapter and a reliable controller, and finish joints with the right soldering kit (Milwaukee M12 for cordless convenience or Weller WE1010NA for bench precision). The more you invest in material quality - diffusers, solid connectors, a stable brick - the more your machine will age like furniture instead of a tinkerer’s project.
How to decide in practice. If you care most about atmosphere and low fuss, go Hue Solo or Govee Light Bars Pro to get an even, curated glow with simple app scenes and voice control. If you crave playfield choreography and per-segment color, commit to addressable strips, plan power injection points, and accept a bit of wiring and soldering up front. One quick bench tip that saved me time: test a single lamp or a short strip in place before you commit to a full run. Color balance can lie under old plastics and varnish, and one trial will save you a weekend of rework.
Take action this weekend. Pick the category that matches your goals, grab the right power source (Apple USB-C for testing or the StarTech brick for big installs), and schedule a night to install and tune one zone. If you want help laying out a wiring plan, choosing cut points, or dialing color temperature to flatter your table art, ask and I’ll help you plot it step by step. Make the quiet zone feel intentional, let the playfield sing, and enjoy that tiny thrill of flipping a switch and watching your space come alive.


