Home Podcast Studio Setup: Build a Podcast Corner in Your Man Cave
Published on November 7, 2026 · By Chris Murphy

A corner of the room you already have can record clean, listenable two-person audio. What decides the sound is not the microphone's price tag but the order you work in: fix the mic position and the corner first, then spend on gear. For most hobby setups the default path is one USB dynamic microphone and a pair of headphones, and an audio interface becomes worth it when a second seat turns into a regular thing.
Key insights
- Fix the corner before the gear: mic distance and placement change the sound more than the microphone's price tag.
- Start with one USB dynamic mic and headphones, then add an interface when a second seat becomes regular.
- Soft material at the first-reflection points beats foam tiles on every wall.
- Two seats need a mic per person, separate recorded tracks, and closed-back headphones for each.
Why the corner matters more than the microphone
A microphone does not record just your voice. It records your voice plus every surface the sound bounces off before and after it reaches the mic. That is why the same microphone sounds different a few feet away, and why upgrading the mic while keeping the same corner usually means hearing the same problem in higher detail.
The work order follows from that. Sit where you will sit. Set the mic at the distance you will actually record at. Then judge the room from behind that microphone.
That is the only seat that matters.
Distance is the zero-dollar treatment: a mic held close to your mouth hears mostly you, while the same mic a desk away hears mostly the room. Before any money is spent, moving the mic closer is the cheapest upgrade available.
One honest boundary belongs here, because the rest of this article assumes it. Acoustic treatment tames echo inside the recording. Nothing cheap blocks sound that travels through a shared wall or a garage door, and a garage or basement is the worst-case room in the house for outside noise. Treatment makes the corner sound good on the recording. It does not make the room silent, and no panel in a hobby budget does.
USB or XLR with an interface: which path fits your budget and plans
USB or XLR is the first real money decision, and picking wrong costs either flexibility or patience. Four questions settle it: what the budget is today, whether a second person is a plan or a maybe, how untreated the room is, and how far this setup is expected to grow.
A USB microphone plugs into the computer and records. That is the whole signal chain, and for a solo show in a corner that behaves itself, it is enough. What it gives up is room to grow: one input, one gain knob, and no way to add a second mic later without changing systems.
An XLR microphone needs an interface between it and the computer, which means more money up front and one more box to learn. What it buys is the upgrade path. XLR mics do not care which interface they plug into, so the mic bought first is still the mic in use after every other piece of the chain has been replaced. Dynamics also tend to hear less of an untreated room than condensers, which matters in a corner that is mostly drywall and windows.
The crossover point is the second chair. Solo recording and occasional guests favor USB. A regular second seat, or a noisy untreated room, favors XLR dynamics through an interface.
One trap hides in the cheapest two-person path. Two USB microphones usually mean two computers and two audio files that have to be lined up in editing. Some setups can aggregate both mics on one machine, but it is driver-dependent and flaky enough that the workaround becomes the project. An interface with two inputs records both mics as separate tracks in one session, which is the outcome the two-seat table actually needs.
If two people are already the plan, treat this decision and the two-seat requirements later in this article as the same decision read from two sides.
Which cheap acoustic fixes actually work in a small room
Treatment works in a priority order, and spending against that order is the difference between a corner that sounds dead and a wall that looks decorated.
First is mic position and distance, which the first section covered, because it is the fix that costs nothing. Every panel bought before the mic is placed is a bet the placement could have settled for free.
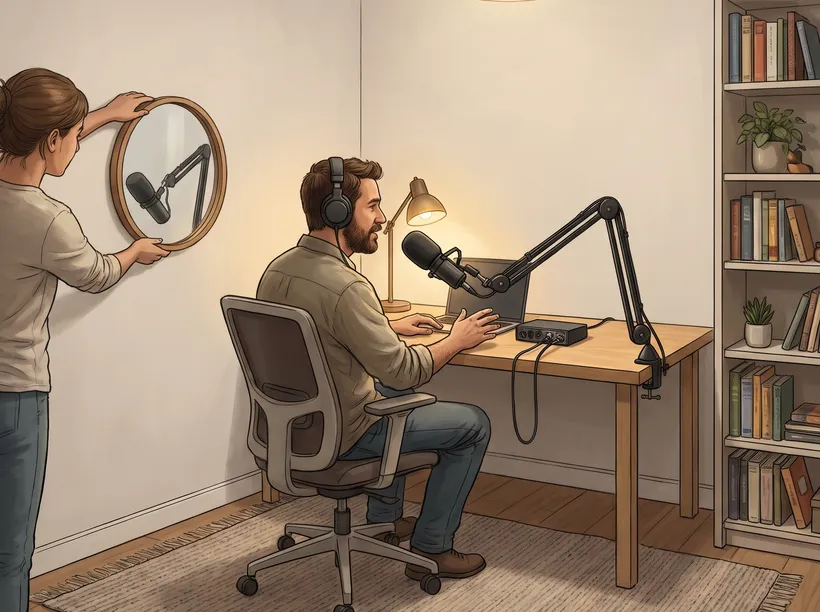
Second is soft material at the first-reflection points. These are the spots where the sound of your voice bounces once off a wall before reaching the mic, and they can be found without any gear. Sit in the recording seat while someone slides a mirror along the wall at your head height. Anywhere you can see the microphone in the mirror is a reflection point, and that is where a rug, a curtain, a bookshelf or a hanging blanket earns its spot.
Third is movable absorbers. A folded blanket on a stand, a freestanding panel pulled in behind the mic, a coat rack parked in the corner for a session. Movable beats pretty here, because the corner that records on Tuesday is the snack table on Saturday.
Last is noise-source control, which gets its own section below, because the right fix depends entirely on what is making the noise.
The famous cheap fix deserves its verdict. Thin foam tiles mostly tame high frequencies, which is why a foam-covered wall makes the room sound different without making the recording sound finished. The material that helps a spoken voice most is usually already in the house. Rugs, curtains, full bookshelves and blankets absorb more of what a voice recording actually suffers from, and they cost nothing new. A closet full of hanging clothes is the free vocal booth, and some hosts never beat it. A packed corner bookshelf works as a diffuser, scattering sound instead of flatly bouncing it back.
If the room is rented, or the wall is shared with someone who did not agree to the project, reversible beats adhesive anyway. Moving blankets, freestanding panels and furniture placement do most of what mounted foam would, and they come off without taking the deposit with them.
Where the desk, mic and chairs go in a real room
Placement is decided by the room you have, not by a diagram, so the method is a walk through the room with the furniture in mind.
Start with the desk. Open and close the door first, because a door that swings into the boom arm will do it at the worst moment of the best take. Check what is behind the candidate wall: a window behind the microphone is the worst wall in the room, since the glass reflects your voice straight back and any street noise arrives at the mic before you do. A heating vent or floor register under the desk hums through every quiet moment. The wall that passes the door test, the window test and the vent test is usually the corner, and the desk goes facing into it.
Then the mic, on a boom arm rather than a desk stand. The arm holds the mic at a fixed distance without the hunch a short stand forces, it keeps keyboard and desk thumps from traveling up into the recording, and it gives the desk surface back. Route the arm where a hand will not naturally land.
Then the chairs, seated, not imagined. Sit down and check the sight lines to the door and the screen. If this is a two-seat room, the chairs need working separation between the speakers, which the section below turns into a hard requirement. Then hold the layout against the room's other job: game night, when three people arrive and the corner has to give some of itself back. A podcast corner that only works when nobody else wants the room does not survive its own schedule.
The minimum footprint is whatever that test leaves behind: a desk that seats the format, room for the chairs to work as chairs, and clearance to open the door and reach any seat without moving a stand. There is no universal number, because there is no universal furniture.
What is making that noise in your recording
Noise diagnosis starts with one cheap check: record thirty seconds of nobody talking and listen on headphones. Every suspect below survives a casual soundcheck and shows up in room tone.
If the noise is a steady hiss or rumble that changes when the heat or air conditioning kicks on, it is the HVAC vent. The fix is moving the desk out of the vent's line, not raising the gain to talk over it, which lifts the vent and your voice together.
If the noise is a hum that appears halfway through a take and was not there at the start, check the mini-fridge. A fridge compressor does not run constantly. It cycles on when the box warms up, which is why the room sounds clean for the first ten minutes and dirty for the next two. Unplug it for the session and plug it back in after.
If the noise is a whir that ramps up mid-session, it is the computer. Fans spin harder when the machine is working, and a tower anywhere near a close-mic'd desk will be heard. A long cable or a USB extension puts the tower outside mic range without moving the desk.
If the noise is coming from outside, cars, the garage door, the neighbor's weekend project, the fix is scheduling and honesty. Record when the street is quiet, try a heavy blanket over the door as a partial fix, and accept the boundary from the first section: nothing in a hobby budget stops sound that comes through the structure.
What changes when a second person sits down
One microphone shared across a table records a compromise. The voice farther from the mic sounds like it is calling from the hallway. The gain knob serves two people, so a level set for the quiet host clips the loud guest. And neither problem fully fixes in editing, because the two voices do not reach the mic with the same weight to begin with.
The two-seat table has three hard requirements. A microphone per person. An interface with an input for each mic, recording each one to its own track. And closed-back headphones on every head, because sound leaking out of speakers and back into an open microphone is what makes two-person recordings sound distant even when both voices are loud and clear.
Placement does the rest. Point the back of each microphone at the other speaker, since a cardioid mic, the standard podcast shape, hears least from directly behind. Sit as far apart as the room allows, and use boom arms so the mic comes to each person at distance instead of either of them leaning in. Prefer dynamics over condensers here, because the untreated room that barely registers on a close dynamic mic registers twice through two open condensers.
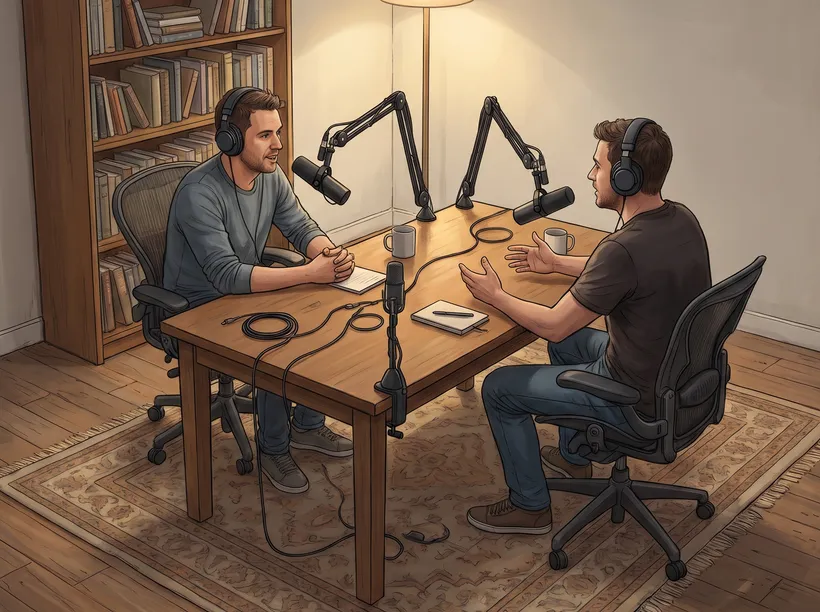
Gain staging sounds like studio vocabulary, but it is two sentences. Set the gain with the person who is actually speaking, at the distance they will actually record at, and let each person check their own level in headphones before the real take. A level checked once per person stays out of the argument later.
Remote co-hosts are a different setup with different tools, and everything above assumes both people share the room.
What to buy first, second and later
The minimal tier is one USB dynamic microphone, a boom arm and headphones. It records one person well and two people badly, for exactly the reasons the last section listed. It is the right first purchase for a solo show, and stopping there is not a failure.
The comfortable tier adds an interface with two inputs, a second microphone and headphones for each seat. This is the tier that records a real two-person conversation on separate tracks, and it is where most hobby setups belong.
The stretch tier is a pair of matched XLR dynamics and the full treatment pass from the earlier section, done after the furniture has settled. It is a refinement, not a rescue. Nothing in it fixes what placement got wrong.
The first upgrade is rarely a more expensive microphone. Record a normal take in the current setup and name the flaw you hear. Echo and background noise are corner work, and a pricier mic will capture them just as faithfully. If the room is handled and the recordings are clean, that is the point where better gear actually pays, and it usually starts with mic position, seat distance and monitoring rather than the microphone itself.
Close the loop with a two-minute check. Record both people talking over each other once on purpose. That is the moment levels clip and the arrangement shows its seams. Adjust gain and seating while the room is still set up, while everyone is still in their chairs, and, if the fridge was one of the suspects, while it is still unplugged.