Fake Window for a Basement Man Cave: Ideas, Placement and Lighting
Published on October 19, 2026 · By Brandon Dixon

The good news first: a fake window can genuinely make a windowless man cave feel less closed in, and it doesn't take a contractor. What sells the illusion is physics rather than magic: light that arrives from a vertical surface near eye level, from behind a frame with some depth, in a color that reads as daylight instead of lamp light. Get those three things right and the panel reads as a window. Get them wrong and you own a very flat nightlight.
There are three ways to get there. If you rent, or want the whole thing done in a weekend for cheap, the plug-in shadow-box build is the default path. No wiring, no drywall, it hangs like a picture, and it moves with you when you go, which is why it's the build this article walks through. If you own the room and want the most convincing result, a tunable LED panel set into a built frame and powered from a nearby circuit is the upgrade, and the build section covers exactly what that route's wiring involves and where DIY should stop. The third option, smart backlit scene displays, skips the build entirely. What any given display costs, and how well it imitates a window, depend on the specific product, so it gets judged on the same criteria as everything else here.
Key insights
- A believable fake window has directional light at seated eye level, real depth behind the frame, and light color that reads as daylight.
- Renters should start with the plug-in shadow-box route: no wiring, no drywall, hangs like a picture, and moves with you.
- The hardwired tunable-panel route is the permanent upgrade, but it means cutting drywall, working with power verified off, or hiring an electrician.
- Use daylight-labeled or tunable white LEDs, dimmed and warmed in the evening, because warm yellow bulbs read as lamp light, not daylight.
- Blinds left slightly open inside a frame with real depth do more for realism than a bigger, brighter panel.
What a fake window has to do to fool the eye
A windowless basement usually runs on one overhead fixture, and that explains most of the closed-in feeling. The light is uniform, it comes from a flat ceiling above your head, and it has no direction. A real window does nearly the opposite. It lights the room from a vertical surface at about head height. It gives the eye a bright plane to read as outside. And it has depth, with a frame, a reveal and something behind the glass, so the light belongs to a place instead of to a panel.
That's the short job list a fake window inherits. Light arrives from a vertical surface near seated eye level, not from the ceiling. The color and brightness read as believable outdoor light. And there's real depth, a wide frame and a visible reveal, so the glow sits behind something instead of on it.
Depth is the part that's easiest to skip. A diffuser panel stuck flat to the wall with an LED strip behind it can get the brightness right and still read as decoration, because it has none of the window's third dimension. That gap is the whole difference between a window and a light box, and it's worth more effort than a bigger or brighter panel.
Everything below gets measured against these three. Route choice, placement, light color, and anything you were already about to put in an online cart all pass or fail on this list. One expectation to set while we're here: a fake window supplies light and the look. It doesn't supply a view behind the glass, air, or egress, the emergency exit a real basement window can also be built to serve.
The three routes: plug-in shadow box, hardwired panel, or smart scene display
The cheapest route is a shadow box with an LED strip inside. A shadow box is an open-front display case with a solid back, the kind sold everywhere for ticket stubs and jerseys. Turn one into a window by running an adhesive LED strip around its inside perimeter, taping paper across the front as a diffuser, and sending the cord out a hole on one side. It's the most forgiving route for a renter or a first-timer. No wiring, no drywall, no landlord conversation, and it hangs and moves like a framed print. The realism has a ceiling, because a strip behind paper offers limited diffusion and limited color control. For dated context, one published 2021 build put this route under about $100 in materials, with the box itself around $30, and put window-sized retail light products at several hundred dollars at the time. Those are 2021 project prices, not a quote for your next hardware run.
The convincing route is a tunable LED panel set into a built frame. Slim tunable-white LED panels, the kind sold as panel lighting, have adjustable color temperature and a remote. Set one into a built frame with a rabbet, which is a shallow ledge cut so the panel sits recessed behind the face of the frame, hang it into studs, and power it from a nearby circuit. This route looks the best and commits the most. One published project updated in 2024 logged about $150 in materials, two days, and a beginner rating, and that rating covers the carpentry only. The wiring is its own gate, and the build section treats it that way.
The no-tools route is a smart backlit scene display, bought finished and hung up. Some show animated window scenes with day and night presets, and some take app control. Sizes, prices and behavior are per-product facts. The main question to ask about any unit is whether it puts real depth behind a frame, or whether it's a flat screen showing a picture of a window. A flat screen is a poster that glows.
That's three routes, and four decisions decide between them: budget, comfort with tools and wiring, whether you own the wall, and where realism ranks against convenience and speed. Picture the same basement arriving at two different readers. The first rents, has $75 and one free Saturday. The shadow box is the entire project. It plugs in, hangs like a picture, and leaves with him. His realism is capped, and capped is fine, because the alternative was no window plan at all. The second owns the room, has a weekend and basic wiring comfort, and wants the convincing version. The tunable panel in a built frame is his upgrade, permanent enough to become part of the house. Neither reader is wrong. The route decision isn't which build looks best in principle. It's which one his budget, his lease or deed, and his Saturday can actually finish.
Building the plug-in shadow box window
What follows is the whole plug-in route, sized for a competent beginner, and it fits in an afternoon plus a night of paint drying. If you'd rather follow along with photos, one published walkthrough with pictures covers this same build inside and out.
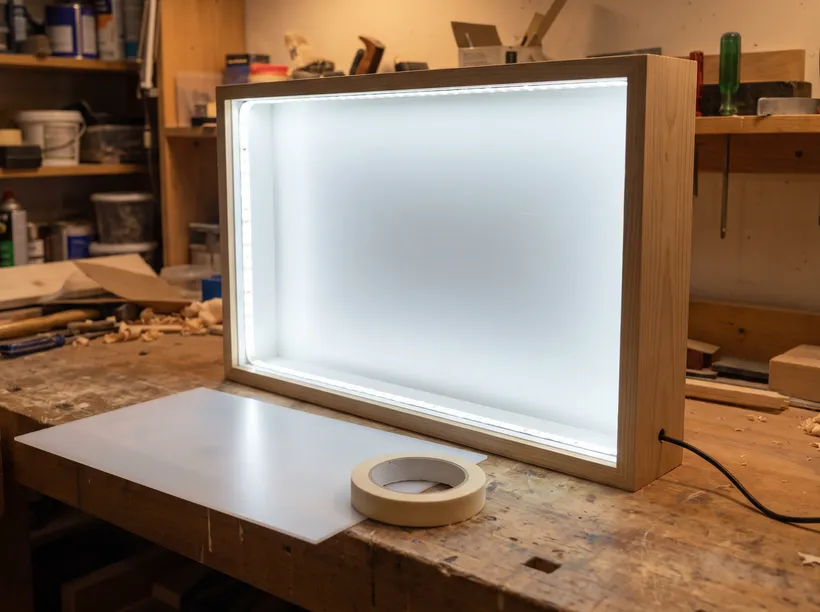
Tools
The tool list fits in a drawer.
- Tape measure and pencil, for the wall space, the inside of the box, and the cord-hole mark. Nothing here gets built on a number you didn't measure yourself.
- A drill, with a bit matched to the actual power cord your strip kit includes. There's no universal hole size, because cord diameters vary. Hold the cord against a few bits and keep the one it passes through without being pinched.
- Scissors or a sharp knife, to trim the diffuser paper and to cut the strip at its marked cut points if it runs long.
- A level, for the one line that gets stared at forever, the bottom edge of the window.
- Hanging hardware, chosen after you lift the finished, loaded box. The weight, not the ambition, picks the hardware.
Materials
- A shadow box with a solid back, deep enough that the strip and the diffuser never end up touching. If you'd rather build one, one published DIY version used 1x4s for the frame, a 1/4-inch plywood back, and an acrylic light diffuser panel across the front.
- An RGBW (red, green, blue, white) LED strip with adhesive backing, long enough to run the entire inside perimeter with a little spare. The white channel is what lets the strip hold a color temperature instead of just a color, which is the property the light section leans on later.
- Plain paper, printer or parchment, taped over the strip as the improvised diffuser, and as the second layer if dots show through later.
- White paint for the inside of the box. Every surface in there is a reflector, and the build this method follows recommends white for maximum reflection.
- The cord that reaches the outlet, usually the strip kit's own plug plus an extension, its total length measured before the cord hole gets drilled.
The build, in order
- Size the box to the wall, then check the strip against the box. Measure the wall and the inside perimeter the finished box will have, and buy a strip at least that long. A corner that stays dark glows unevenly, which is the exact look this project exists to escape.
- Buy or build the box, solid back, with enough interior depth for air between strip and diffuser.
- Paint the inside white and let it dry fully. Bare wood eats light, and white returns it.
- Run the strip all the way around the inside perimeter on its adhesive backing, pressing the corners down so nothing lifts later.
- Diffuse the front face. Tape plain paper across the opening, or set the acrylic diffuser panel in place. This cheap step is what the finished look actually depends on.
- Drill the cord hole low on one side face, using the bit you already matched against the cord. Low keeps the drop toward the outlet, not across the middle of the wall.
- Hang the box level, on hardware matched to its real, loaded weight. A light shadow box behaves like a picture. A heavier acrylic-fronted DIY box should be treated like what it is, heavier.
- Route the cord to the outlet along a baseboard line or behind furniture, and out of any walkway. If the outlet already feeds a power strip and plenty else, an LED strip is a small load, but it's still worth knowing what the circuit carries before it gains another plug.
- Plug in, then run the four checks that mark it done. The panel glows evenly. The LEDs no longer read as dots through the diffuser. The cord reaches the outlet without crossing anywhere anyone walks. From the usual seat, the frame shows an actual reveal instead of a sticker.
If dots or hot edges survive the diffuser, add a second layer of paper or more distance between strip and diffuser. More light never fixes bad diffusion.
What the hardwired panel route adds
The hardwired route is the panel at permanent power. Its real requirements, as the published panel project runs them: opening the drywall for a wiring box, running NM-B cable in from a nearby outlet's circuit, clamping the cable into the box, and a remote taking the place of any wall switch. It's the most finished, most invisible version, and the electrical work is the reason it isn't the default.
Safety boundary, plainly. Power goes off, and then gets verified off with a non-contact voltage tester, before any of that work starts. If you've never worked on household wiring, don't learn on this project. Do the plug-in build, or pay an electrician. And if the wall belongs to a landlord, the answer is no. Renters don't open drywall.
If the skill bar is cleared, the full published project shows that wiring work photographed step by step.
Where it goes so it reads as a window from the chair
A fake window reads like one only from where you actually sit, so the wall gets decided from the chair, not standing in the middle of the room with a drill in hand.
Pick a wall your seating faces or glances at, where a real window would live. Behind the couch, it stops being a window and becomes wall art with a power cord. Not opposite a mirror, either. A mirror doubles the glow flatly and hands the trick away on a second screen.
Then weigh what the new glow competes with. A fake window throwing light toward the TV is the same dusk glare real windows cause, with no view as a consolation. If the only wall that works produces glare, a dimmed panel or a run of blinds in front is how the annoyance gets solved.
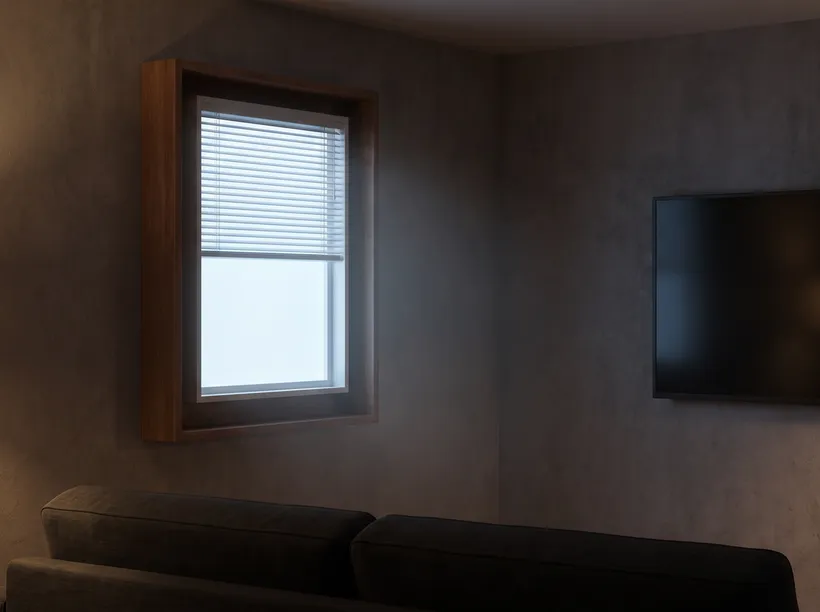
Height comes next, and it's a seated measurement. Prop the tape where your head actually sits in the chair, or have whoever uses the room most hold it up. Standing eye level is for shelves and portraits, and a window hung at standing height reads as a window for people standing in the doorway.
Most of the depth got built or bought when you picked the route. It still matters from the one angle you spend your evenings on: a wide frame, a visible reveal, the panel recessed rather than flush. One finishing move, borrowed from the published panel project, does double duty: hang blinds inside the frame and leave them slightly open. The slats sell the daylight-coming-in look, break up the flat glow, and quietly explain why there's nothing but light behind the glass. The trick costs almost nothing and works on DIY builds with any thin blind.
Before a single hole, cut a cardboard rectangle to the planned size and tape it to the wall. View it from the chair, at night, with the room lit the way you actually use it. That's the one moment when moving it is free.
Getting the light right, morning to midnight
Color decides whether the panel reads as daylight or as a mood lamp. Warm, yellow-toned light reads as lamp light, because that's the color every table lamp in the house already is. Daylight-labeled and tunable-white light read closer to what a window delivers, so prefer a tunable RGBW strip when you're buying, since one strip can run warm at dusk and cool at midday.
For a sense of the range one tunable strip covers, the strip in one published 2021 build spans roughly 2700K, close to sunset-warm, up to about 6500K, close to noon. That's that product's observed span, not a rule that daylight equals a specific temperature. The useful part is the range itself: one strip covering a whole day of looks.
Control keeps it believable late. A bright noon-glow panel at 9 pm is decoration, and the fix is to dim it and warm it in the evening, by dimmer, remote preset, or by schedule if the strip supports one. Some strip setups can automate that shift across the day on their own. The manual version gets there too, and it involves remembering rather than an app.
Two notes. First, the diffusion work above has to be done before any of this tuning, because no light color rescues a panel with visible LED dots. Second, the fake window is one layer of the room's evening lighting, and how the layers sit together is its own practice.
The pre-build check for a window, not a light box
Every failure mode in this project is cheap to catch on paper and expensive to catch in a finished wall. Run the list before buying anything.
- Warm bulbs in the plan. Plug one set in and look beside actual lamp light. If it reads warm and yellow, retune to daylight-labeled or tunable white before the diffuser goes on.
- No diffusion in the plan. Look at the strip through the intended diffuser before final assembly. Dots mean more layers or more distance, not more brightness.
- A flush panel with no reveal. Stand at the chair and look for shadow at the edges. A panel meeting the wall flat needs casing or a recess, or it stays a light box.
- The wrong wall, or glow aimed at the TV. Sit where you sit, with the mock-up up, and check sightline and glare. Move it or plan blinds.
- Power and control as afterthoughts. Trace the cord route to a real outlet before hanging anything, or accept that drywall work is part of the hardwired version. Confirm the remote or dimmer lives within reach of where you sit, not in a drawer across the room.
- Brightness at full forever. Look at the plan at the hour you actually use the room. If that's 9 pm, the plan needs an evening setting, dimmed and warmed.
Every item above takes minutes. The ones skipped tend to cost a project, which is the exact currency this build was meant to spend carefully.